Flourish with A Bling Inspiration

Are you here for my June/July Giveaway? Click here for more info after you have read this post of course :)

Hi everybody! I have been a little quiet this week because I had surgery on Friday but I am very happy to say that I am on the mend and am miraculously healed Praise God!

Today I am over on the Flourish with a Bling Blog here sharing a fabulously comical layout using FWAB Gold Jasmine Laser Flourish, FWAB Up in the Sky, FWAB Lee’s Tree & FWAB Taylah’s Toadstools.

Here is a sneak peek and for more details head on over to the FWAB blog here.

tn_IMG_3440

Until next time, happy scrapping!

Amy Prior xx

You Sparkle You Shine

Are you here for my June/July Giveaway? Click here for more info after you have read this post of course :)

Hi everyone! I am going in for surgery on Friday which hopefully will be just minor but it could end up being a major surgery so I might be out of it for a while. I did get a chance to play last night however and created this fabulous layout using My Minds Eye & Rhonna Farrer Designs Spread your wings and Fly Collection. Seriously can I just say that I have always loved Rhonna and her designs but man she still blows me away each and every time she releases something and My Minds Eye and Rhonna are simply a match made in heaven.

tn_IMG_3420

I have also used some fabulous Heidi Swapp goodies for this layout including a 12×12 stencil and 2 shades of Color Shine Mist. I have to say that Color Shine is my definate favourite mist. Yes yes I hear you all saying that I say that about everything but no joke, Heidi’s line is above and beyond all my expectations. The Colour is incredible and vibrant and the shimmer is over the top and so much more than others out there on the market I just adore them! Think Dylusions inks mixed with Perfect Pearls Mists x20! LOL

tn_IMG_3422

To create the background on white cardstock, I have simply sprayed the centre of the page with Pink Color Shine (over the stencil) and then I have sprayed the edges with Yellow Color Shine. I then sprayed some more pink and yellow to help blend and create an ombre effect towards each other. When this was dry I have added a few spritzes of water to my palm and flicked the water over the top to create this cool bleached effect on the color shine. This technique is so fun and easy to use with Water Based paints that are not water proof.

tn_IMG_3421

I have fussy cut my photo for this layout because I just thought it was such a cute pose and it was wanting to be leaned on some pretty papers. I have distressed the edges and machine sewn around the border before adding some washi tape, enamel dots, doilies and the paper layers.

tn_IMG_3423

I have then added some stickers from the My Minds Eye Spread your wings and fly collection and to help distress them up to coordinate with my layout, I have simply scratched the surface with a nail file.

tn_IMG_3424

Well that is it from me today, until next time, happy scrapping!

Amy Prior xx

Giraffe Baby Shower Invitations

Are you here for my June/July Giveaway? Click here for more info after you have read this post of course :)

Hi everyone! I wanted to come by and quickly share some more super cute baby shower invitations that I have recently made. We have 2 fabulous ladies at church who are due to have babies only a couple of weeks apart so when I made the uber cute duck invitations for Leanee, well Ailish wanted some too LOL. Ailish loves Giraffes so I went and found the cutest Giraffe svg file from http://www.svgcuts.com and got started.

I had to create a card shape for the giraffe to be mounted on and although it isn’t perfect, it did the trick.

IMG_1253[1]

I made 45 of these with the help of my fabulous friend Nicole. I actually cut a few corners and ended up having to recut a lot of these. I definately think SVG cuts needs to work on the elements on this file more but overall Ailish was super happy which is all that matters of course.

IMG_1305[1]

Product Used include:
Bazzil Cardstock
Silhouette Cameo Machine
SVG Cuts Giraffe File
Yellow Satin Seam Binding
Ranger Glossy Accents
X-Press IT High Tack Foam Tape
Helmar Scrap Dots

Well that is it from me today, until next time, happy scrapping!

Amy Prior xx

Berry71Bleu June Challenge

Are you here for my June/July Giveaway? Click here for more info after you have read this post of course :)

Hi everyone can you believe I squeezed in another last minute challenge entry for June? Yep the Berry71Bleu Challenge for June was Summer Theme and I had these fabulous photos of my girls rolling down the grassy hill at Terrigal that were dying to be scrapped.

tn_IMG_3314

I was lucky enough to purchase the June A Piece of Cake Designs Kit and additional kit which I have used for this layout.

tn_IMG_3315

I decided to challenge myself to go back to an older technique that I haven’t used in a while. Tearing. I decided I wanted to tear everything and I have torn the papers, photos and elements which were parts of patterned papers that were included.

tn_IMG_3316

I also thought the black background was such a fun contrast and I cannot remember the last time I used a black background.

tn_IMG_3317

I am so happy with how this layout turned out for such minimal effort. All the wooden veneer Basic Grey Hipster pieces were coloured using the Crayola Watercolor Paints that came in the kit and I have added lots of random stitching the layout to finish it off alongside some fabulous star sequins that came in the kit also.

Thanks for looking and don’t forget to leave me some love so I can come visit you too.

Until next time, happy scrapping!

Amy Prior xx

My Minds Eye June Sketch Challenge

Are you here for my June/July Giveaway? Click here for more info after you have read this post of course :)

Hi everyone! I decided to do some more challenge playing before the month’s end and this time I have played along with the fabulous My Minds Eye June Sketch Challenge. Here is the sketch and you can see the challenge on the My Minds Eye Blog here.

And here is my take on the sketch. I have added a few layers which of course is what I seem to do too often LOL. I have used the My Minds Eye Unforgettable Collection Papers for this layout on some Kraft Cardstock.

LittleBoBeepByAmyPrior

I have ripped and sliced various pieces of the My Minds Eye Unforgettable Papers and then doodled randomly on some as well.

LittleBoBeepByAmyPrior2

I have added some Pink Paislee Mist-a-bles Arrows to the layout which I have coloured using Tim Holtz Distress Inks and a paint brush to create an ombre effect.

LittleBoBeepByAmyPrior3

I have also added a Black Sequin Heidi Swapp arrow as well as a piece of an A2Z Scraplets Scalloped Chipboard banner which has simply been coated with white paint and then doodled on.

LittleBoBeepByAmyPrior4

I decided to add a Pink Paislee Artisan Element circle over the photo which has been coloured slightly with some Tim Holtz Distress Ink and then I have added some American Crafts Chipboard Thickers which I have sanded back to create a more distressed look.

LittleBoBeepByAmyPrior5

Final touches included some Black Dylusions Ink Splatters, Some very random machine stitching and doodling then voila!

Well that is it from me today. Hopefully I can still fit in one more challenge entry before the month’s end. Until next time, happy scrapping!

Amy Prior xx

The Best Thing About Memories Is Making Them

Are you here for my June/July Giveaway? Click here for more info after you have read this post of course :)

Hi everyone! I hope you are all well, as I busily try to catch up on my Design Team Commitments after the chaos of moving house, I decided to have a quick play with the Scrapbooking From Scratch Quote Challenge this for June hosted by Charmane from Charms Creations.

The Quote is “The Best Thing About Memories Is Making Them”

tn_IMG_3236

I decided to use the fabulous Modern Romance Line Papers from Websters Pages and I have used the Clean and Simple sides for my backgrounds and then have fussy cut lots of fabulous flowers to use in my clusters.

tn_IMG_3237

In the bottom left corner, I have added some fussy cut flowers alongside a Charms Creation Lollipop, Prima Marketing Ingvild Blome Light Bulb and a fabulous Heidi Swapp Buzz Word.

tn_IMG_3238

I have used some American Crafts Thickers alongside some Prima Marketing ABC Stickers for creating my title.

tn_IMG_3239

The Background has some subtle masking using Texture Acrylic Paint and the Brocade 12×12 Crafters Workshop Template. I applied the paint with a natural sponge to get an interesting effect.

tn_IMG_3240

A Prima Marketing Resin Window, some Prima flowers alongside some Pink Paislee Artisan Elements and the layout was complete.

Overall I would have to say I am not a fan of this layout LOL. I am my own worst critic I know but I went way off track with my original plan and the page suffered.

Thanks so much for checking out my blog and don’t forget to leave me some love .

Until next time, happy scrapping!

Amy Prior xx

Grungey Sugar High on the FWAB blog

Hi everyone! I am over on the Flourish with a Bling Blog today sharing a fabulous mixed media filled grungey layout. Click here to view the full post but here is a sneak peek just to tease you…

tn_IMG_3234

I have used the fabulous 7 Dots Studio Domestic Goddess Papers and elements alongside some fabulous Prima Flowers, A2Z Scraplets Stencil, Texture Paste, Dylusions Inks, tonnes of Flourish with a Bling goodies and so much more. Check out the blog post here for more details.

Flourish with a Bling June Sketch Challenge

Are you here for my Jun/July Giveaway? Click here for more info after you have read this post of course :)

Good morning everybody, I hope you are all well and rested after the lovely weekend. Some of you in other countries are still in the middle of your weekend so to of you lucky peeps enjoy! Today I am here to share this month’s challenge over on the Flourish with a Bling blog. This month it was my turn to create a challenge and because I was moving house and I only just found out about the challenge the first week of June, I went ahead and created a sketch from an old layout of mine that has Flourish with a Bling goodies used on it. I have love Flourish with a Bling since their beginning so of course I had plenty of older layout to choose from.

Checkout the Flourish with a Blog post here to join in the fun and go in the running to win a fabulous FWAB prize pack eeekkk yummo!

Here is the sketch that I have created…

June Sketch Challenge 2013

…and here is my example layout…

Perfect Love

Be sure to head on over here and checkout the challenge details so you can be in it to win it! Awesome pack of goodies up for grabs for the winner and still plenty of time to get your entries in.

Until next time, happy scrapping!

Amy Prior xx

The Color Room Palette #152

Hi everyone! I am back today to share the latest Color Room Palette which is absolutely amazing! Seriously loving this palette of colours and want to play over and over again with this one.. Check out the Color Room website here and the Facebook Page here to join in the fun and get in with a chance to win some fabulous prizes!

152

Here is my take on this amazing palette. I was planning on using the fabulous sketch as inspiration also but alas I got carried away in my own creativity.

TCR#152_AmyPrior

The background White Cardstock has been decorated using some PanPastels and Lindys Stamp Gang Starburst Stain Mists.

 tn_PartyGirlByAmyPrior3

Next step was to add a doily and my photos. I have distressed the edges of my photos using a nail file and added a super cute Studio Calico Paper Clip, some Washi Tape, Heidi Swapp Buzz Word and an awesome Prima Shabby Resin Frame. I have added some colour to the frame using Tim Holtz Distress Inks.

tn_PartyGirlByAmyPrior2

I then went to town adding some flowers. Yes I usually go overboard but is there such thing as too many flowers? LOL I have also added some yummy Flourish with a Bling flourish pieces around the cluster and to the left, there is some lace and Heidi Swapp Banners poking out from underneath.

tn_PartyGirlByAmyPrior4

I then decided to add some Washi Tape, Pink Paislee Artisan Element Circl and a Prima clock to the bottom corner. The Pink Paislee Artisan Element was distressed with some Tim Holtz Distress Ink.

tn_PartyGirlByAmyPrior5

Some added journalling, Prima Baubles, Studio Calico Stars & Sequins and my layout was complete. I added some colour to the Wood Veneer stars using some more Tim Holtz Distress Ink.

Well that is it from me today, I am moving house today YAY so I will be quiet for a few days but don’t forget to check back next week for the announcement of my giveaway and maybe a new giveaway announcement 🙂

Until next time, happy scrapping!

Amy Prior xx

Prima May BAP & Scrapbooking from Scratch May Quote Challenge

If you are here for my giveaway, click here. Only 1 more days to enter!

Hi everyone! I am back to share another quick layout with you all today that I have based on this month’s Prima Marketing BAP Challenge and I have also incorporated the Scrapbooking From Scratch May Quote Challenge  also. Click here to view the Prima May Challenge Blog Post and click here to visit the Scrapbooking From Scratch Gallery to see all this month’s challenges.

Here is the Prima BAP Sketch for the month of May and the Quote over at SFS is “Girlfriends are the sisters we pick out for ourselves”

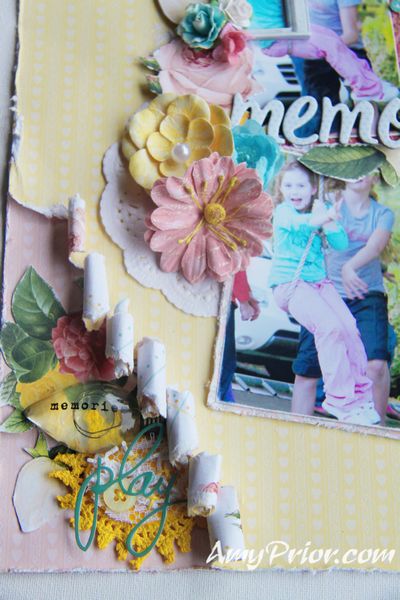
So here is my take on the sketch and the quote. I actually mucked up the quote a little whoops but it still works. I have used the fabulous Prima Marketing Firefly Collection papers.

tn_The3AmigosByAmyPrior

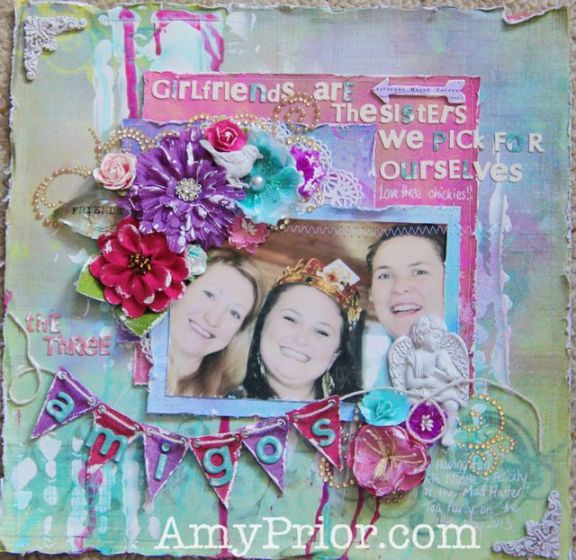
To add more texture to the background, I have added some Gesso using the Prima Donna Downey Random Dots Stencil and I smudged it a little so I decided to scrape the circles down the page to add a more smeared effect. There is never any mistakes in art LOL. When this was dry, I have dripped some Chalkboard Mists & Lindys Stamp Gang Mists down the page and then stamped some random areas with a Tim Holtz Texture Stamp using some Turquoise Perfect Pearls Powder.

tn_The3AmigosByAmyPrior2

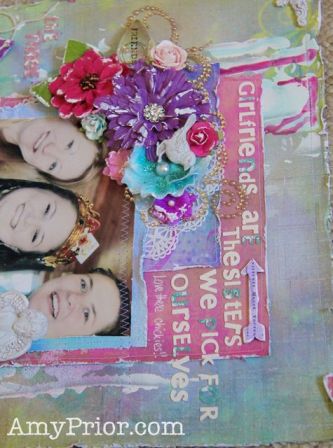
I have used a bunch of Prima Shabby Resin, Flowers, Bling & Alpha for this layout as well as some Prima Donna Downey Canvas Script Flags that I have sprayed with some Chalkboard mists.

tn_The3AmigosByAmyPrior4

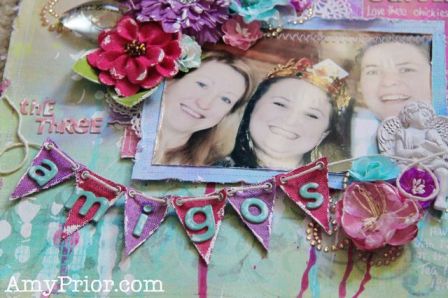
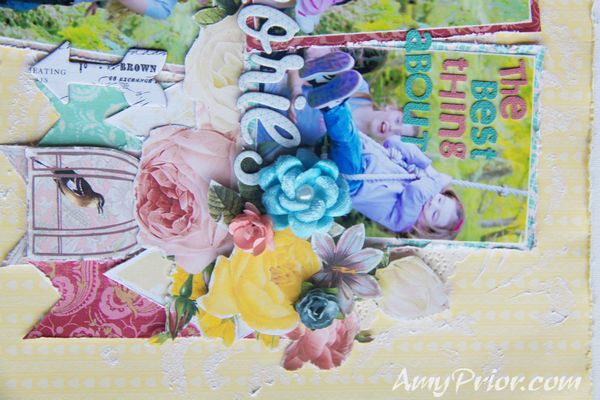
I have then added some Gesso to the edges of the Flags, and threaded through some Twine to add the banner over my layout.  I then grabbed some American Crafts Thickers to spell out Amigos and stuck them down to my Ranger Craft Sheet so I could easily sand them back a tad before adhering to my flags using some Ranger Glossy Accents.

tn_The3AmigosByAmyPrior5

I just love how this layout has turned out. Some random smearing of Gesso onto some of the Prima Alpha and a Pink Paislee Mistable Arrow added then my layout was complete. As you can see I have twisted and added to the original sketch a little (the banner was added) .

My adhesives by choice are always Helmar including Scrap Dots, 450 Glue & others.

Well that is it from me today, thanks so much for reading and until next time, happy scrapping!

Amy Prior xx